I had a pound of chorizo in the freezer and some leftover gulf shrimp that I needed to use, so decided to go Mexican. Super easy and was very flavorful with the smoky chipotle, lime and cilantro. The crunch and creaminess of the slaw was perfect with the meaty mixture. Perfect in summer when ears of corn are sweet with large kernels for the salsa. I used my indoor iron grill but the corn and jalapeno could be grilled on the outdoor grill as well.

Chorizo and Shrimp Tacos with Chipotle Slaw & Grilled Corn and Jalapeno Salsa
- 1 pound ground chorizo
- ½ pound of Gulf Shrimp
- ¼ cup Red Onion – chopped finely
- Tabasco Chipotle Sauce
- Lime juice
- Fresh cilantro – chopped finely
Directions:
- Add chorizo to a skillet and cook on medium heat
- Add red onions
- In the pan chopped up the chorizo with spatula as it cooks so it is a crumble
- Add five splashes of the Tabasco chipotle sauce (or to taste)
- When chorizo is just browned, make a hole in the center of the skillet
- Put raw shrimp into the center hole to cook in the chorizo sauce while the chorizo finishes on the outside of the shrimp
- Cook shrimp until pink and tender – about 5 minute
- Squeeze fresh lime juice over mixture
- Sprinkle with fresh cilantro
- Place mixture on warmed flour tortilla
- Add chipotle slaw (see below) and some grilled corn and jalapeno salsa (below)
- Add a dollop of sour cream, if desired

Add Shrimp to the center of the Chorizo
Chipotle Slaw
- 2 cups raw cabbage and carrots cut in slivers, cole slaw style
- Most groceries sell slaw mixes all ready to go
- 1 Jalapeno – chopped very finely (seed them if you want less heat)
- 1 small can of chipotle peppers
- ¼ cup red onion
- Fresh Cilantro
- 2 TBSP of Apple Cider
- 1/3 cup Mayo
- 2 Limes for juice
- Coarse Black Pepper
- Salt to taste
Directions:
- Put chipotle peppers into a food processor and puree
- Combine cabbage, carrots, jalapeno, onions and cilantro into a bowl
- Stir in the chipotle puree
- Stir in apple cider and mayo
- Add salt and pepper to taste
- Squeeze two limes over mixture and stir
- Put in refrigerator until needed

Finished Chipotle Slaw
Grilled Corn Salsa with Fire Roasted Jalapenos
- 3 ears of corn – no husk or silk
- Olive oil
- 2 medium red tomatoes or 3 Romas – finely chopped
- ¼ cup red onion – finely chopped
- Fresh cilantro finely chopped
- 3 jalapenos – split in half, deseeded
- 1 ripe avocado – chopped into squares
- 2 limes
- Salt
- Coarse Black Pepper
- Cayenne Pepper
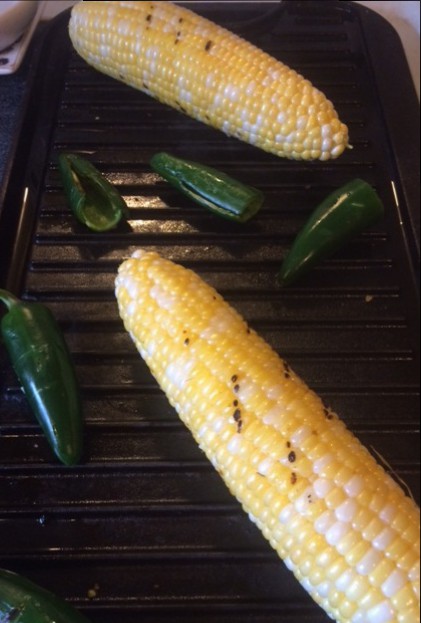
Grill roasting corn and jalapeno
Directions:
- Rub Olive Oil on the ears of corn
- Place ears of corn on hot grill
- Rotate Corn on all sides to get char – about 6 to 8 minutes total
- Along with corn put jalapenos on the grill – char the skin side
- Allow corn to cool to handle and using a knife cut corn from cob
- Chop grilled jalapenos into small pieces
- Add corn and jalapenos to a bowl
- Toss in tomatoes, onion, cilantro and avocado
- Cayenne pepper, salt and pepper to taste – toss lightly
- Refrigerate until needed
- Serve with chips (see below)

Grilled Corn and Jalapeno Salsa
Homemade Tortilla Chips
- Corn Tortillas – cut into triangles (quartered)
- Salt
- Vegetable or Canola Oil
Directions
- Heat oil in skillet to medium high heat
- Drop in the tortilla triangles
- Flip so both sides fry evenly
- Remove when hard and golden but not brown
- Put chips on a paper towel to drain
- Salt immediately